
Not strictly a cake, but tastes absolutely unreal and so easy to make I thought I'd share it here.The thing that has always put me off making ice cream is either the need to have an ice cream maker (don't have) or the patience to stir it every 20 mins or whatever it is to stop ice crystals forming (don't have either). The great thing about this recipe is that once it's mixed, you just put the ice cream in the freezer and forget about it till you want to eat it. This was my first go at making ice-cream, and I was stunned by both taste and simplicity. It got chosen over custard to go with blackberry and apple pie - which is totally unheard of, custard is usually king!
The recipe is in two parts: the basic ice-cream, which you can flavour any way you desire; and then the blackberry syrup. You could swap the blackberry syrup for chocolate, strawberry, raspberry, or pretty much anything within reason (it probably wouldn't taste so great with caterpillars, but you never know...).
Blackberry no-stir Ice Cream Recipe (serves 4ish)
Ingredients
For the blackberry syrup:
9oz (250g) blackberries
1oz (25g) castor sugar
1.5 tbsp (20ml ish) water
For the basic no-stir ice-cream:
10 fl oz (300ml) double cream (single would probably work ok too)
2.5oz (70g) castor sugar
2 egg yolks
2 drops vanilla flavouring
Method
Part 1: Blackberry Syrup
Make this first to give it time to cool before adding it to the basic no-stir ice-cream.
Put all the syrup ingredients into a saucepan, and bring to the boil.
Reduce the heat, and simmer for 8-10 minutes (until the blackberries have broken down).Strain through a fine mesh sieve.
Return to the pan, and simmer gently for 5-10 minutes until you have a thick syrup (the exact timing for simmering here is a bit guessed as I had a bumped knee to attend to in the middle of this stage).
Leave to cool completely (speed up by putting in a china or metal dish, and if you feel like being daring - or have no patience - risk killing your fridge by putting it inside)
Part 2: Basic No-Stir Ice-Cream
Put the cream in a saucepan and bring to the boil.
Stay with it and watch like a hawk - it may do a milk on you and boil over fast.
Reduce the heat and add the sugar.
Stir well to dissolve the sugar, then remove from the heat and leave to cool slightly (otherwise you may scramble the egg yolk - but don't worry, it was quite hot when I added it and no scramblage occurred).
Whisk the egg yolks in a mixing bowl with a fork.
Pour the cream and sugar onto the egg yolks, stirring constantly.
Add the vanilla flavouring.
Pour the mixture into a freezer proof container of some sort.Part 3: Joining it all Together
Pour the blackberry syrup into the cream mixture, and give it a bit of a stir, so it goes nice and rippley.
The blackberry syrup will sink to the bottom, leaving a lovely cream colour on top with a few pinky purple splots, then when you dish it up there's a solid layer of blackberry loveliness at the bottom.
Yum, oh yum.
Seal the container nice and tight, and put in the freezer to set - about 5-6 hours.
Notes and tips:
- Usually when making ice-cream you have to keep stirring it - because the milk causes it to crystallise. This recipe doesn't use milk, hence no need for stirring.
- If you can get vanilla pods then by all means use them instead of vanilla flavouring - I find pods a tad pricey, so used flavouring instead - having said that, this ice-cream is so creamy you could probably get away with no vanilla at all.
- I've said serves 4-ish - we got 2 adult portions one night (3 good dessert spoonfuls); 2 side portions to go with blackberry and apple pie the next night; plus 1 small portion for "pudding after lunch mummy" and 1 small portion for mummy. So probably 4ish servings altogether.
Where the recipe came from
I used 2 recipes as bases for this recipe - because neither did what I wanted on their own. I also changed around the quantities - the original vanilla ice cream recipe called for 500ml cream and 3 eggs - I only had a 300ml pot of cream (the largest I could get in Sainsburys) and 2 eggs. It worked fine.
Original Recipes:vanilla ice cream by Lee Cox on the BBC food website
blackberry syrup was loosely based on the ripple sauce recipe by Valentine Warner, also BBC Food website
Hope you enjoy it!
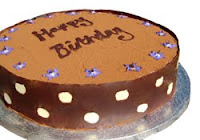 Ok, when I was writing my last blog post I soon came to realise that it had been so long since I last posted that I had an awful lot of stuff to tell people about. And that it would be better to split it over a few posts rather than cram it into one!
So here is one of them: making chocolate collars for cakes. I was given the task of creating a cake for a rather large joint birthday celebration, with minimal instructions beyond "make it a big chocolate sponge". So I hired a 12" round cake tin, and got thinking... I saw a picture of a similar cake in a decorating book I was given a few years ago (The Essential Guide to Cake Decorating), and really really liked it. So I thought I would have a play. For anyone who fancies a go, here is what I did, along with tips I picked up on the way.
How to make a chocolate collar for a cake
Equipment/Ingredients
A cake
Dark chocolate - preferably with at least 70% cocoa solids
White chocolate, or 1 pack of white chocolate buttons
Buttercream
String (how long?!)
Ruler
Pencil
Greaseproof paper (or shiny contact, or clear plastic)
Optional: if it's a hot day, a fan and hair dryer
Preparation
- Either sandwich two sponge cakes with filling of your choice, or cut one large cake in half horizontally, fill, then stick back together.
- Cover your filled cake all over - sides and top - with a thin layer of buttercream icing (flavour is up to you) Try and use the layer of buttercream to create a nice flat and even surface for the chocolate to go on.
- If it's a hot day, put the buttercream-covered-cake into the fridge to harden slightly.
Chocolate Collar
- Use a piece of string to measure all the way round the cake (the circumference). Mark the string where the ends meet before you take it away from the cake.
- Measure the piece of string (and if you are a sieve brain like me, write down the measurement)
- Now measure the height of the cake (and again, write it down)
- Get either some 'clear plastic', 'shiny contact' (and no, I had never heard of either of these and couldn't get hold of any easily) or just use some handy old greaseproof/baking paper.
- Use a pencil and ruler to draw out a rectangle on the greaseproof that will fit the height and circumference of the cake - PLUS add about 5mm to the height, and about 15mm (1.5cm) to the length - the extra to the length is so that you don't end up with a gap when you put the collar on the cake. See digression below. Also allow a cm or so on top of that each end so that you can tape the greaseproof down and stop it moving. Cut out the rectangle, and secure to a flat surface with sellotape.
- Get the white chocolate buttons, and moisten the flat side very slightly with water. Press down onto the greaseproof at artistic intervals. Don't press too hard, they will both squash and slip. Alternatively, melt some white chocolate and use a piping bag to make little round spots. This is probably the better way to do it, as the spots will stick really well to the greaseproof. Leave to set.
- Melt the dark chocolate gently - either in the microwave on low power, or in a heatproof bowl over a saucepan of water. Do not let any water touch the chocolate - curdleage *will* occur.
- Spread the dark chocolate all over the greaseproof paper - carefully. If you aren't nice and gentle, the white spots will move or even come off, to much general cursing.
- Leave to set. If it is a hot day, spend a long time holding a fan over it. Then spend a long time with a fan in one hand and a hair dryer in the other when you realise that one end is setting faster than the other.
- Once the chocolate is still a little shiny - ie it won't crack when you bend it, but it won't drip all over the side either - untape the greaseproof and pick it up, and very very carefully wrap it around the cake.
- If it's a very hot day, put it in the fridge to set.
- Once set, *carefully* unpeel the greaseproof..... et voila! (or, curses)
Tips
- Practice first
- Make sure it's not going to be the hottest day of the year
- Try and take pictures in the shade - melting time is pretty quick
- It really is worth getting high cocoa content chocolate
- White chocolate seems to melt quicker and not set as easily as dark chocolate...
Digression from step 5.... when I got to this bit I just made the length on the greaseproof exactly the same as the piece of string. My husband came in as I was about to place the collar on the cake. And said - most helpfully - "you did allow extra length for the width of the chocolate didnt you?". To which I replied with a blank face.
He works at PMF - working with metal at incredibly high levels of precision. He did explain the reasoning to me, but my brain is so full of other stuff (Whoopie Pies mainly) at the moment it didn't really want to take it in. Officially, to get the chocolate collar exactly the right length for the cake you need to work out the 'mean circumference'. Something to do with the circumference, the thickness, and Pi. All you really need to know is add a decent extra bit so you don't have to a) start from scratch or b) melt an extra bit of chocolate and stick it over the gap.
 Well it's been a while... and so many things have happened I don't quite know where to start!First, I was featured in the Sussex Express, then the Evening Argus picked it up, then the Leader. I think I am now officially a W-List celeb...In between I strayed away from the Whoopie Pies and created a couple of pretty stunning birthday cakes with spotty chocolate collars - the 12" version can be seen here (currently middle bottom photo). Once you've got the hang of it, chocolate cake collars come out pretty well - see my chocolate cake collar post here for what I did (and things to avoid....like doing it on the hottest day of the year)Then last week was spent manically making tons of Whoopie Pies in preparation for my appearance at the Uckfield Festival Big Day Out, alongside Ruth's of Cooksbridge (fantastic, amazing cupcakes. Comments included "mummy, are those cakes real? they aren't are they?")I took a break now and then from the kitchen to make some bunting - much easier than I thought. Hopefully see another post about making bunting....I managed to find a great site for having banners made: Print A Banner - very reasonable price, easy website and very fast. 6ft x 1ft was only £16 - for my own design. And it fitted the stall perfectly.The day was amazing. I was up at 5.45am picking flowers from the garden to go in vases, along with some borage for on top of the new double chocolate whoopie pies (hopefully see my post on borage for more info). We arrived just after 8am and began setting up the stall, putting out the bunting and the banner and flowers. It looked pretty darn fine once all the Whoopie Pies and Cupcakes were in place...The sun shone down, we got a mention on Uckfield FM, and shifted a fair few cakes! Then as the man was fishing and the boy was being auntied, I got some Pimms with the proceeds and then dragged myself down to The Ark for a few glasses of wine. A pretty good day all in all!


